Monday, 4 April 2011

Using Reactor

The Reactor Tutorial

Using Reactor

The reactor is an element of the 3ds Max program that allows objects to be simulated with effects such as gravity and other forces to create animations.


In this tutorial we used the Rigid Body Collection reactor, this was placed onto the scene along with two boxes, box 1 was given a mass of 0 and box 2 given a mass of 10.0. Using the preview animation this enabled me to preview how the forces would take effect; of course the box with the high mass would fall onto the box with no mass, simulating the effect of gravity. Alternative settings can also be adjusted using the reactor settings, such as friction and stiffness etc.


Once happy with the simulated animation it can then be animated onto the timeline and rendered into a video animation clip.


Bowling Lane Simulation

Using a pre built bowling lane imported onto the scene along with a bowling ball and bowling pins, the effect of the reactor tool could now be used simulate bowling animation.


By using the rigid body collection on the scene the mass and friction etc of the bowling ball and the bowling pins could now be modified.


The reactor also enables the prediction of the animation, example: when the ball is thrown down the lane into the bowling pins the reactor can simulate the effect of the bowl hitting the pins and knocking them down. This effect can be seen in the image below and the full simulation in the video below.


I found this particularly useful as it will assist in the animation process and essentially reduce animating times. Trying to animate the effects of gravity and other forces that act upon objects in real life can inevitably be extremely difficult. The reactor tool can be used in a wide number of animations such as bouncing balls, bullets and all other objects and movements that will prove vital in my final animation project.  

Morpher Modifier

The Morpher Tutorial

Morphing

In this tutorial we learnt how to apply a morphing animation to make a face move in a selection of different facial expressions.


 In the first stage a head was placed on the scene, in this tutorial it was a pre-built model but could essentially be a personal created object. The head was then duplicated 5 more times so that 6 different heads were now available on the scene. On each head a different facial expression was created via editing polys on each of the faces but keeping one head as the original.


Once all of the different expressions were created, the original head was applied with the Morpher modifier and each of the other heads where then added to an individual channel on the Morpher editing panel.

Upon rendering the animation, the Morpher would allow the original head to change into the edited heads giving an impression of different facial expression on one face. This effect can be seen in my rendered work video below.


I found this tutorial particularly useful as it has given me the essential knowledge to allow me to create talking humans within my animation project. The Morphing can also be used to animate animals etc and can enhance the quality of work that I can produce in my final project.

Bones, Skin and Envelopes

Bones Tutorial
Adding Bones
In this tutorial we learnt how to apply bones into animated people in order to create an effect of limbs moving.
The first stages of this were using a pre-made object of the top half of a human, the body and the two arms. Using the bones tool the construction of the inside bones were made. These were the top part of each arm and the lower part including the hands. In order for the bone tool to work effectively the main body sector was also given a bone in order for the other arm bones to function from.


Once the bones were positioned inside of the arm it was essential that the IK System was used. This enabled the bones to move on a pivot so that when the hand was moved the top part of the arm would function and move like it would in real life.


Adding Skin Modifier and Envelopes

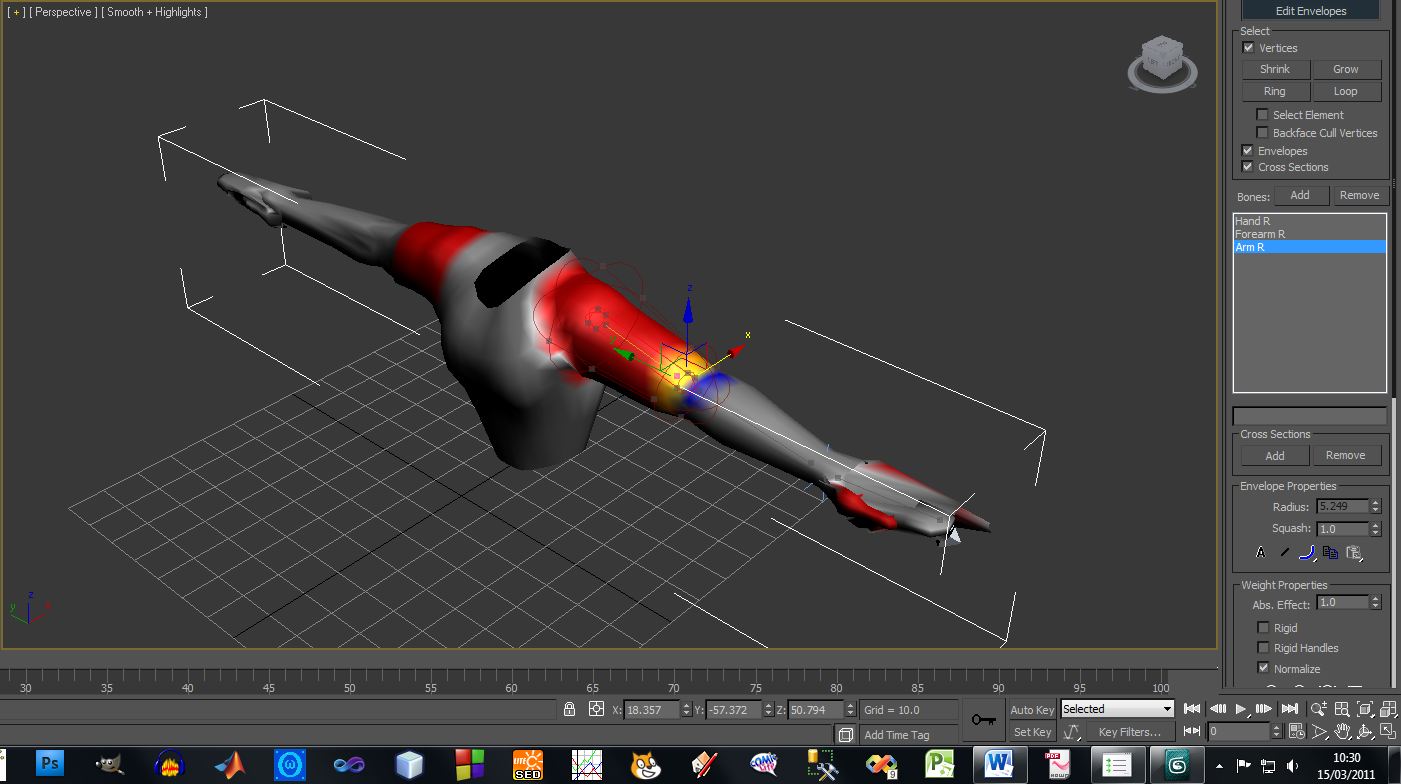
To ensure that the bones were applied to the entire object, known in this section as the skin, a skin modifier was applied to the object and the bones then added into the skin. To ensure that all of the skin was covered when the bones would operate a function known as the envelopes was used. This enabled the adjustment of how much each of the bones would affect different parts of the skin to ensure that when a particular part of the bone moved, so would the surrounding skin.


I found that this was particularly useful as part of my project as I required a man to be positioned correctly over a motorbike in a scene and the bone tool would allow my figures limbs to be rotated and bent into position. Another function known as the ‘Biped Tool’ would work more effectively in my project; this is similar to the bone tool and functions in the same way but is a prebuilt skeleton of a human, already part of the 3ds Max program.


Bouncing Balls

Bouncing Balls

In this tutorial I learnt the basics of understand how animated works and operates in 3D Studio Max. First was the introduction to the timeline and then the introduction to moving objects and getting animations to work using the autokey and setkey tools.
Once I had the basic understanding of using the autokey and setkey it was time to begin with moving and animating objects.
To practice a sphere was used as an object to understand the operations of animation. Once I had the understanding on this I moved onto using multiple objects in one scene and getting these objects to function and animate individually.


Simple and multiple objects being animated and moving


When I was happy with the animation we were introduced to rendering animation and the settings that can be adjusted accordingly to the scene or files being created. Settings adjustment to file format, resolution, timeline etc. I rendered the animation of the moving balls a number of times with different settings to get an understanding of simple rendering.

The rendering process of my animation.


To editing multiple objects animation in a scene and to duplicate there animations such a ball bouncing on the ground and looping this process the Track View ‘Curve Editor’ and ‘Dope Sheet’ where used. In these editing panels fine adjustments can be made to slow, speed up and edit the effects and sequence of the animations on the timeline. I felt that this was particularly useful as it will assist in making my project animation a lot smoother and easier. 


I found these particular techniques used in today’s tutorial very useful as it enabled me to gain an understanding of ways that I can animate my final project.

Rendered Work Videos:


Thursday, 3 March 2011

MoodBoard

Goldeneye Trailer - Moodboard

This moodboard consists of the kind of animation techniques that I will be aiming to use within my aniamtion project. As can be seen there are explosion techniques and techniques where bullets are flying through objects and a selection of materials.

There are also a selection of sceney backgrounds that I will also be hoping to feature within my animation e.g. the Goldeneye Train is located in a landscape background etc.

The gun firing the bullets contains elements of smoke that I will be adding to my aniamtion to give extra effects to realism.

This moodboard will show the viewer the kind of emotion that I'm aiming to achieve to give to this trailer and its animated scenes.

Storyboard - Digital Copies

The James Bond Trailer Storyboard

Goldeneye

The scene will begin with a Walther PPK being held and then firing a bullet into the air, these scene will be shot in slow motion so that the bullet can be scene exiting the barrel of the gun.


In this scene the bullet will continue its journey through the air and smash its way through the 007 James Bond Logo resulting in the logo shattering into pieces as if it were made of class.


This scene will build the Goldeneye train scene and feature clips from the movie itself. The train will be travelling along the track and enter a tunnel. On its exit from the tunnel the train will come to a stop and explode into a massive fire ball.


This scene will build the final duration of the animated movie trailer. This scene will consist of the plane scene where it is flown over the edge of the cliff and begins falling to the rocky bottom. After its decent it will hit the ground in another final huge explosion. 


Wednesday, 2 March 2011

Artifact 5 - Scenery Tree

Scenery Tree


Construction Process

This tree will build part of the scenery from the train scene. The tree is a very simple construction but has created many problems in its construction process.


The tree begins with small squares made from flat green planes. The small flat green planes form the leaves of the tree and the lines that the leaves sit on are the branches formed from the line tool.


The branch soon becomes a construction of this process cloned over many times using the 'Clone' tool until the branch is full of lines and sqaures that form the tree branch. A couple of thin cylinders are added into the bush of twigs and leaves to form a thicker branch. These thicker branches are then added with a Bitmap of Bark from the Material Editor tool.

The Tree Trunk


The tree truck is the main sector of the tree. It is formed by a construction of a cylinder edited with the editable poly tool in order to shape it into a truck and thick tree branches. The tree truck is bare until added with the bark material from the material editor tool.

The file of leaves and twigs along with the thinner tree branches are now merge into the scene along with the tree truck and pieced together to form the over structure of the tree.

Problems

This form of structing the tree has created a scene that is now full of shaped polys which is an issue when trying to reload the saved copy of the 3DS Max file. In the first atttempt of the tree construction a file was created at the size of 95MB!

The tree has now been re-structed in order for it to contain less polys and shapes so that the rendering period is reduced as well as the loading process. This will play a considerable advantage when it comes to rendering my work for my final project trailer.